Table of Contents
How to Set Up the Yealink T2 and T4 Series IP Handsets
This guide explains how to set up the Yealink T2 and Yealink T4 series handsets to connect to the SureVoIP Single User and Hosted VoIP service.
These instructions apply to:
- Yealink T19P (includes the Yealink T19P E2)
- Yealink T20P
- Yealink T21P (includes the Yealink T21P E2)
- Yealink T22P
- Yealink T23G
- Yealink T26P
- Yealink T27P
- Yealink T27G
- Yealink T28P
- Yealink T29G
- Yealink T40P
- Yealink T41P
- Yealink T42G
- Yealink T46G
- Yealink T48G
These instructions will also apply to the Yealink T18P, Yealink T3 series and Yealink T4 series handsets.
For the Yealink T18P you will need to obtain the IP address by following these instructions first as there is no display.
If you have purchased the your Yealink handset from us directly then your handset will be automatically provisioned and no manual configuration will be required. See our store for our handsets we can supply.
See the Yealink official website for further information on the Yealink handsets.
Configuration
- You will need your Welcome Pack to hand as it contains your credentials
- In your web browser, type in the IP address of your handset.
To find out the IP address, press Menu then 1. Status and 1. IP is the IP address.
Default username is admin and default password is SUREVOIP followed immediately by the last 6 digits of the MAC address in upper-case. - Click on the Account tab.
- Select Account 1
Or another unused account if Account 1 is already used. Note which account you use.- Account Active should be On
- Label should be SureVoIP
- Display Name should be SureVoIP or your own name. This will display on your telephone phone screen when idle.
- Register Name will be your SIP Username/Auth ID - this will be listed in your Welcome Pack
- User Name will be your SIP Username/Auth ID - this will be listed in your Welcome Pack
- Password will be your SIP Password(Secret) - this will be listed in your Welcome Pack
- SIP Server will be your SIP Registrar and Port should be 5060 - this will be listed in your Welcome Pack
- Transport should be UDP.
- Voice Mail should be *97
- NAT Traversal should be Disabled
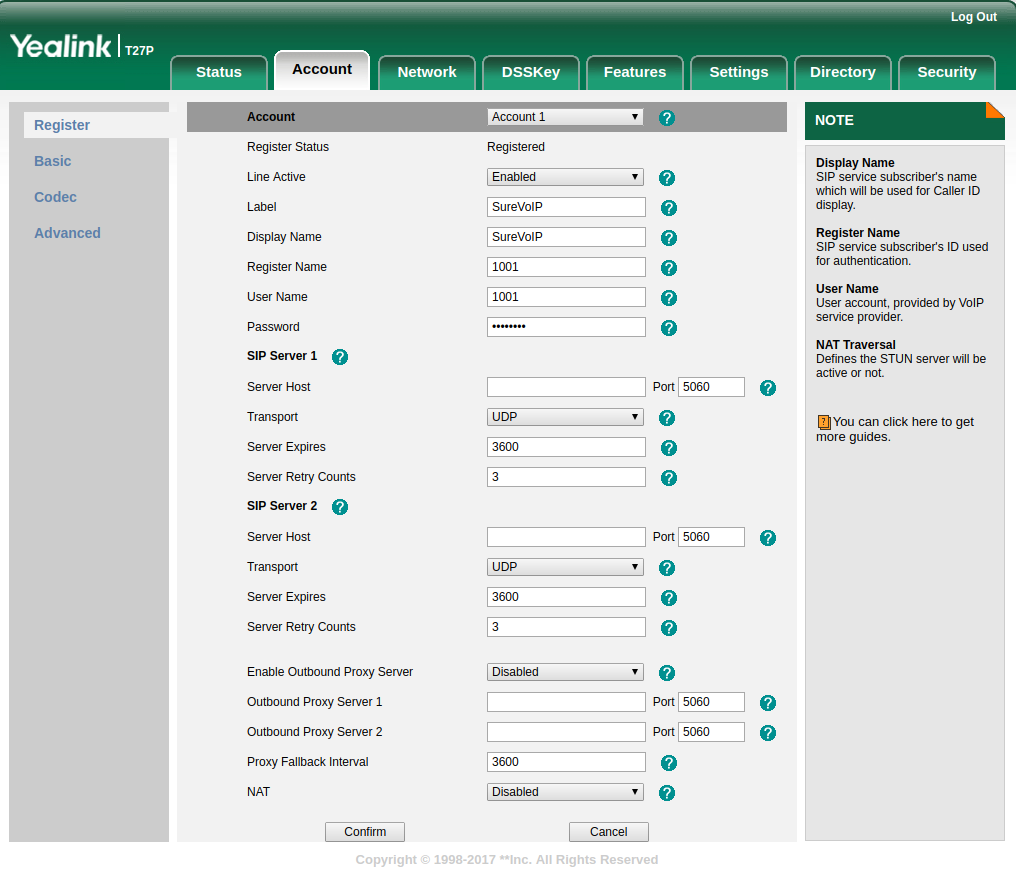
- Click Confirm at the bottom of the page.
- Click the Phone tab at the top. Then select the Tones section.
- Select Great Britain under Select Country.
Of course, if you are not in the UK, select which country you are in! - At the top, select the DSS Key section.
- Towards the bottom, expand the Line Key section.
- At Line Key 1, under Type select Line. Under the Line column choose Line 1.
If you chose not to use Account 1 and used Account 2 or another instead, select Line 2 or the corresponding Line to which Account you used.
The Line Key corresponds to the round Line buttons along the right-hand side of the display. - At the bottom, click Confirm.
- Reboot your phone by clicking on the Upgrade tab then click Reboot.
- Once rebooted, SureVoIP should appear at the Line Key chosen, and the phone icon on the display should be solid. Test a call by clicking the corresponding Line Key button and placing a call.

Additional Settings
Handset Features
Troubleshooting
If the phone icon by the SureVoIP account is not solid, go over the set up instructions above and check the User account, password and SIP server settings.
Ensure SIP ALG is disabled on your router. See this page for further information.
If those are correct, also check your firewall settings.
If you are still not able to connect, contact SureVoIP Technical Support.
Call Trace
For troubleshooting, we may ask for you to provide a call trace or SIP trace.
Obtaining this is straight forward.
1. Log into your phone web interface
2. Go to Settings → Configuration
3. Set Pcap Feature to Start

4. Make a test call or re-register your account by clicking Confirm on the accounts page
5. Go back to the Configuration page and click Stop
6. Click Export and save the file where you can easily locate it
7. Send the saved file as an attachment to Support